
Setup guides for using Synchrony with your DAW. Each guide covers plugin installation, routing, recording your performance, and exporting the tempo map.
Setting up with Ableton Live
- Install and scan — Add Synchrony to your VST3/AU plugin folder and scan in Ableton’s Preferences
- Create a MIDI track — Load Synchrony as an instrument on a MIDI track
- Export your MIDI clips — Select the MIDI clips you want to use as score and performance, and export them using Cmd + Shift + E (macOS) or Ctrl + Shift + E (Windows). Note that Ableton does not export tempo information in MIDI files — after importing, set the correct tempo using Synchrony’s global tempo slider. For projects with multiple tempo events, use Synchrony’s record feature to stream MIDI into the plugin and capture the tempo events directly
- Load into Synchrony — Import the exported score and performance MIDI files into Synchrony. You can also drag MIDI files directly from the Finder or Ableton’s browser into Synchrony’s plugin window
- Align — Run the alignment to generate the tempo map
- Export the tempo map — Drag the tempo map directly from Synchrony into your Ableton project, or export as a MIDI file and import it
MIDI thru (audition with an instrument)
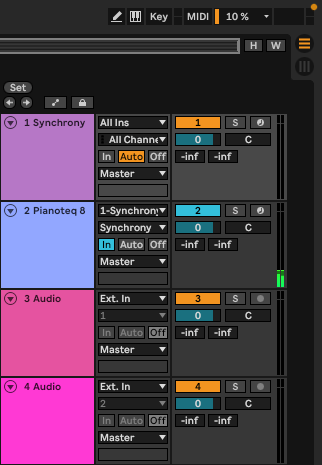
To hear your performance through a virtual instrument while using Synchrony, set up a second track:
- Load your instrument (e.g. Pianoteq) on a second MIDI track
- Set Input Type to your Synchrony track (e.g. “1-Synchrony”)
- Set Input Channel to “Synchrony”
- Set Monitoring to “In”
Make sure the Audition button in Synchrony’s Clip Panel is enabled — this is what sends MIDI through to the output.
Setting up with Studio One
- Install and scan — Add Synchrony to your VST3/AU plugin folder and scan in Studio One
- Create an instrument track — Load Synchrony as a virtual instrument
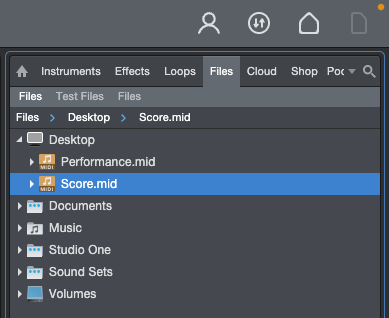
- Load your score — Drag a MIDI clip from the arrangement into Studio One’s Files browser while holding Option to export it as a MIDI file (rather than a Musicloop). Then drag it straight from the Files browser into Synchrony’s plugin window — no need to touch the filesystem. Note that Studio One does not export tempo information in MIDI files — after importing, set the correct tempo using Synchrony’s global tempo slider. For projects with multiple tempo events, use Synchrony’s record feature to stream MIDI into the plugin and capture the tempo events directly
- Load your performance — Same again for your performance clip
- Align — Run the alignment to generate the tempo map
- Export the tempo map — Drag the tempo map directly from Synchrony into your Studio One session, or export as a MIDI file and import it
Setting up with Cubase
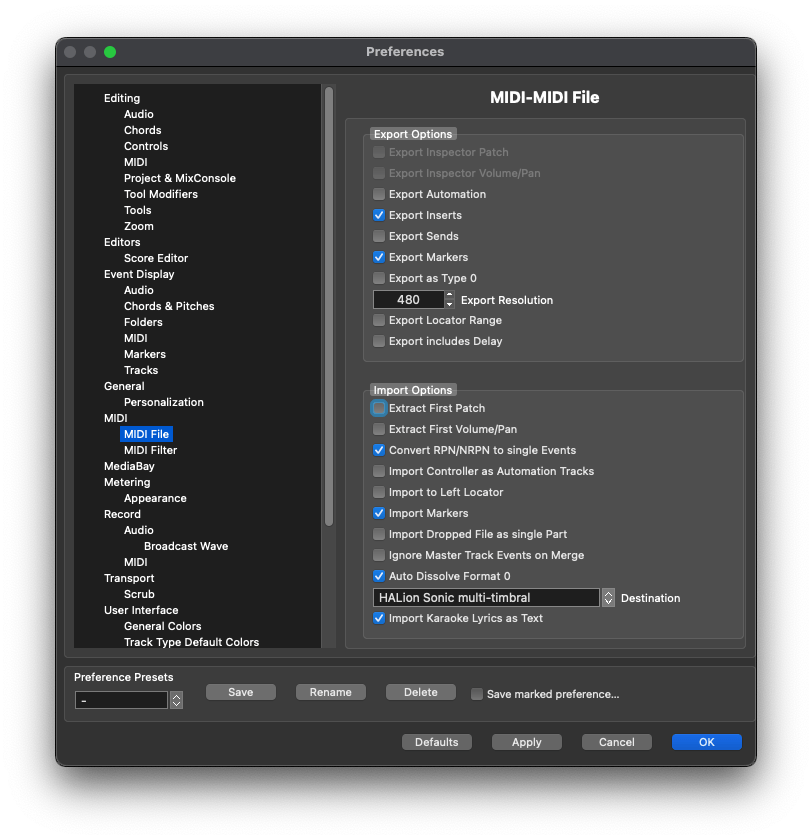
Before you begin: In Cubase, go to Preferences > MIDI > MIDI File and under Import Options, uncheck “Ignore Master Track Events on Merge”. Without this, Cubase will silently discard tempo and time signature changes when you import the tempo map MIDI file.
- Install and scan — Add Synchrony to your VST3 plugin folder and scan in Cubase’s Plugin Manager
- Create an instrument track — Load Synchrony as a VST instrument
- Load your score — Import the score MIDI file into Synchrony. You can quickly drag MIDI files from Cubase’s File Browser in the MediaBay directly into Synchrony’s plugin window
- Record your performance — Arm the track and play your performance
- Align — Run the alignment to generate the tempo map
- Export the tempo map — Drag the tempo map directly from Synchrony into your Cubase project, or export as a MIDI file and import via File > Import > MIDI File. The tempo and time signature events will appear in the Tempo Track
Setting up with Logic Pro
- Install and scan — Add Synchrony to your AU plugin folder; Logic scans automatically on launch
- Create a software instrument track — Load Synchrony as an AU instrument
- Export your MIDI regions — Select the MIDI regions you want to use as score and performance, and export them using Cmd + Alt + E. Note that Logic exports all tempo events in the project, including those before and after a specific MIDI region. Use Synchrony’s Strip Silence button after importing to remove any unwanted leading silence, and the tempo editor to delete unwanted trailing automation points
- Load into Synchrony — Import the exported score and performance MIDI files into Synchrony. You can also drag MIDI files directly from Logic’s File menu or Finder into Synchrony’s plugin window
- Align — Run the alignment to generate the tempo map
- Export the tempo map — Drag the tempo map directly from Synchrony into your Logic session, or export as a MIDI file and import it
MIDI thru (audition with an instrument)
To hear your performance through a virtual instrument while using Synchrony, set up a second track:
- Load your instrument (e.g. Pianoteq) on a second software instrument track
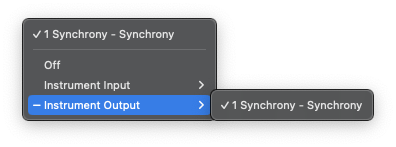
- Open the instrument’s Internal MIDI In settings
- Select Instrument Output (not Instrument Input) > 1 Synchrony – Synchrony
Make sure the Audition button in Synchrony’s Clip Panel is enabled.
This routing gives you audio output when recording, during playback, and when auditioning notes while editing.
Setting up with Reaper
- Install and scan — Add Synchrony to your VST3 plugin folder and scan in Reaper’s Preferences
- Create a track — Load Synchrony as an FX plugin on a MIDI track
- Load your score — Select a MIDI clip in your Reaper project, then press the load button in Synchrony’s score clip panel to import it directly. No file dialogs needed
- Load your performance — Same again — select the performance MIDI clip in Reaper and press the load button in the performance clip panel
- Align — Run the alignment to generate the tempo map
- Export directly — Use Synchrony’s built-in Reaper integration to write the tempo map directly to your Reaper project. Drag and drop export also works as usual if you prefer